I hope every one has an enjoyable one. We are heading to Hubby's brother's place. Things are a little tight at their house so I dug around in the freezer, refrigerator and pantry and came up with lasagna, salad, pumpkin cheesecake, apple pie and no-knead bread. The lasagna is from my 1963 Pillsbury Cookbook that I've made a bunch of times and is a real crowd pleaser. The apple pie comes from the same place. The cheesecake however is a new recipe so I'll let you know how it turns out.
Friday we have another Thanksgiving at my house for my family and that will be ribs, corn on the cob, sweet potato fries, and maybe regular fries. I'm thinking brownies and pumpkin pie for dessert. I should have enough left-overs that I don't have to cook much for the next week or so. LOL
By the way I've been sewing like a demon but haven't taken any pictures, so maybe this week-end with Sister Suzy's help I can get some.
Have a good day!
Judy
Wednesday, November 21, 2012

Sunday, November 4, 2012
10 minute quilt block quilt
I want to warn you this post is picture intense!
I was out cruising the web looking at You Tube videos for some new quilting ideas and found one demonstrating an idea they called the 10-minute block. The premise looked quick and do-able.
I want to make a 48" by 72" quilt. I decided that an 8" finished block would be the best choice for giving me the exact size I wanted. This size of block means you are dealing with 4 1/2" size pieces. I think the last seam is a bit fiddly and possibly because of this, it took me longer than 10 minutes to make one of these blocks.
First, I went through my fabric stash finding 44 different light colored fabrics and cut a 4 1/2" square of each one. Next I cut 8, 4 1/2" squares of the background fabric I wanted to use and made two blocks

Well, looking at those two blocks setting beside each other didn't do much for me, so I pulled out another piece of fabric and made two more blocks.
 Better, but it still didn't do much for me, so I called it a day and went to bed. The next morning I woke up with a stroke of brilliance and decided to recombine the two background fabrics like this.

Much better! By the way that center square of fabric is a green print. The camera washed out the colors!
So to record the process for posterity and to offer some of my thoughts on the process let me show you some photos.

Here are my three piles of fabrics. If I make this block again I will use larger squares of fabric such as the 10" squares they used in the video. Also, if I use all the same size squares I will probably use 5 different fabrics for each square of the block. The 8" finished block I made would make a nice 3D bow-tie block. I, also, though the center square was out of balance if you were going to use all the same fabric for the background. I haven't experimented, but I think a 5 1/2" to 6 1/2" center square would give you a 4" finished center square. A 4 /12" center square ends up being 2 7/8" finished square.

Fold your center square in half. I found that the grain line mattered on this square. Fold it so the grain lines are together. (The non-stretch sides are opposite the fold.) Place right sides together.

Lay the top piece of the fabric sandwich on right sides together.

Pin the seam line and sew a scant 1/4" seam allowance catching the folded edge of the center square.

Fold the two sides back like this.

Because I wanted the backing fabrics to alternate, I laid the third piece of the block down to match the piece showing.

Lay the last square on right side down, pin the seam line and sew a scant 1/4" seam allowance.

When you finish sewing this last seam and open the block up it should look like this. Now open it up and match up center seam lines, pin. The video shows the seam lines as pressed open which would reduce the bulk of crossing seam lines. I didn't, I just nested them running opposite directions.

I want to make a point here. See how close I pinned the center block to its edge? I found two things, one is to pin the right-side first and the second was to be sure to pin as close to the edge as possible. Because if you don't the right end of the center block pulls down away from the outside edge of the seam allowance when you are sewing on this small of a block. Also, don't remove that pin until you are right up to the pin or the center block will shift down.

Now pin like hell the rest of the seam line! See how that seam line is puckered! I discovered that if I kept what I was feeding into the sewing machine flat I ended up with fewer problems. Once you get to the centerline it was easier to then work the pucker out and finish the seam. Unfold and iron your seam allowances flat.
Next up is to play with the arrangement of the blocks! I'll let you know how that goes!
Have a good day!
Judy
Edit: 5/31/17 I have finished this quilt. Go here to see the finished quilt.
I was out cruising the web looking at You Tube videos for some new quilting ideas and found one demonstrating an idea they called the 10-minute block. The premise looked quick and do-able.
I want to make a 48" by 72" quilt. I decided that an 8" finished block would be the best choice for giving me the exact size I wanted. This size of block means you are dealing with 4 1/2" size pieces. I think the last seam is a bit fiddly and possibly because of this, it took me longer than 10 minutes to make one of these blocks.
First, I went through my fabric stash finding 44 different light colored fabrics and cut a 4 1/2" square of each one. Next I cut 8, 4 1/2" squares of the background fabric I wanted to use and made two blocks

Well, looking at those two blocks setting beside each other didn't do much for me, so I pulled out another piece of fabric and made two more blocks.


Much better! By the way that center square of fabric is a green print. The camera washed out the colors!
So to record the process for posterity and to offer some of my thoughts on the process let me show you some photos.

Here are my three piles of fabrics. If I make this block again I will use larger squares of fabric such as the 10" squares they used in the video. Also, if I use all the same size squares I will probably use 5 different fabrics for each square of the block. The 8" finished block I made would make a nice 3D bow-tie block. I, also, though the center square was out of balance if you were going to use all the same fabric for the background. I haven't experimented, but I think a 5 1/2" to 6 1/2" center square would give you a 4" finished center square. A 4 /12" center square ends up being 2 7/8" finished square.

Fold your center square in half. I found that the grain line mattered on this square. Fold it so the grain lines are together. (The non-stretch sides are opposite the fold.) Place right sides together.
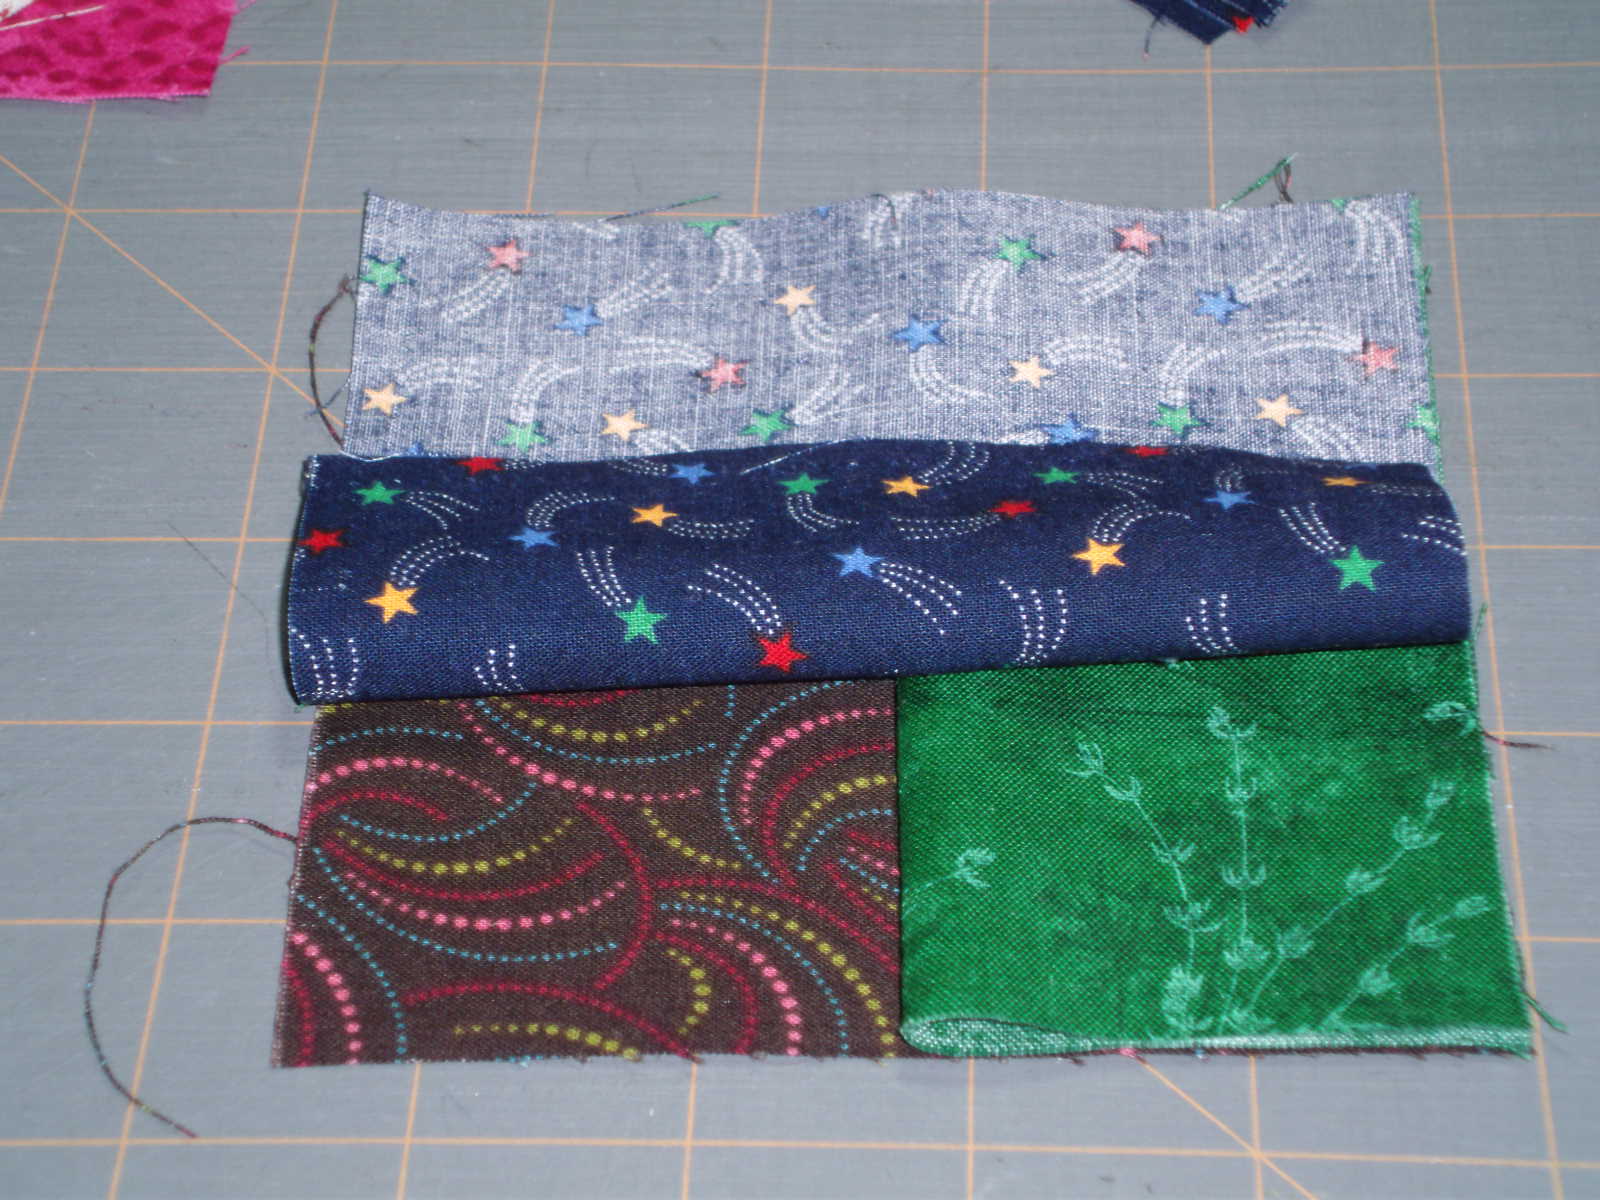
Lay the top piece of the fabric sandwich on right sides together.

Pin the seam line and sew a scant 1/4" seam allowance catching the folded edge of the center square.

Fold the two sides back like this.

Because I wanted the backing fabrics to alternate, I laid the third piece of the block down to match the piece showing.

Lay the last square on right side down, pin the seam line and sew a scant 1/4" seam allowance.

When you finish sewing this last seam and open the block up it should look like this. Now open it up and match up center seam lines, pin. The video shows the seam lines as pressed open which would reduce the bulk of crossing seam lines. I didn't, I just nested them running opposite directions.

I want to make a point here. See how close I pinned the center block to its edge? I found two things, one is to pin the right-side first and the second was to be sure to pin as close to the edge as possible. Because if you don't the right end of the center block pulls down away from the outside edge of the seam allowance when you are sewing on this small of a block. Also, don't remove that pin until you are right up to the pin or the center block will shift down.

Now pin like hell the rest of the seam line! See how that seam line is puckered! I discovered that if I kept what I was feeding into the sewing machine flat I ended up with fewer problems. Once you get to the centerline it was easier to then work the pucker out and finish the seam. Unfold and iron your seam allowances flat.
Next up is to play with the arrangement of the blocks! I'll let you know how that goes!
Have a good day!
Judy
Edit: 5/31/17 I have finished this quilt. Go here to see the finished quilt.
Wednesday, October 24, 2012
life: update
Well, the job I had has petered out and I'm back amongst the leisure classes again. I'm glad I was at the bottom of the seniority list and was laid-off when we worked ourselves out of a job. The job reminded me why I retired five years ago. I have problems dealing with stupidity. The older I get, the harder it is for me to shake my head and keep my eyes on the money.
Good news though, an investment paid out so we will be good till the first of the year then it will be crunch time again. We could probably make it longer but I'm not a very good vegetarian and Hubby shudders when you mention lentils. :>)
So I'm back to playing in my woman cave and I need to get pictures taken and show you what I've been up to.
Everybody have a good day!
Judy
Good news though, an investment paid out so we will be good till the first of the year then it will be crunch time again. We could probably make it longer but I'm not a very good vegetarian and Hubby shudders when you mention lentils. :>)
So I'm back to playing in my woman cave and I need to get pictures taken and show you what I've been up to.
Everybody have a good day!
Judy
Tuesday, September 18, 2012
a puzzle for you
How did this:

an ornate box turtle get into this:

Ducky's water bucket?
I went out to feed and water the critters last night. When I got to Ducky's pen and peered over the fence looking in her water bucket there was the shell of an ornate box turtle floating in her half-filled water bucket. Then the water and shell moved a little bit. I quickly retrieved the bucket from the pen and dumped it out. The turtle didn't seen too worse for the wear and headed for a rock to hide under.
So how did that turtle get in her water bucket? The bucket is twice as high as the turtle was long and where would a duck grab hold of a turtle to plop it in the bucket? I know Ducky is not your average duck but still.

Ducky looks very similar to this one. I guess I need one of those wildlife camcorders to see what is going on in my backyard. But then again maybe I don't! Did you every read 'Tuesday'?
Have a good day!
Judy
an ornate box turtle get into this:
Ducky's water bucket?
I went out to feed and water the critters last night. When I got to Ducky's pen and peered over the fence looking in her water bucket there was the shell of an ornate box turtle floating in her half-filled water bucket. Then the water and shell moved a little bit. I quickly retrieved the bucket from the pen and dumped it out. The turtle didn't seen too worse for the wear and headed for a rock to hide under.
So how did that turtle get in her water bucket? The bucket is twice as high as the turtle was long and where would a duck grab hold of a turtle to plop it in the bucket? I know Ducky is not your average duck but still.
Ducky looks very similar to this one. I guess I need one of those wildlife camcorders to see what is going on in my backyard. But then again maybe I don't! Did you every read 'Tuesday'?
Have a good day!
Judy
Saturday, August 25, 2012
Rain
Rain! We have Rain! And Thunder! And Rain! Whoopee! Maybe the ponds will fill and the cracks in the yard will close up! And in a week or two maybe the farmers will get to plant wheat! And the leak in the roof is still there!
Yeah!
Judy
Yeah!
Judy
life

Life or why I haven't been posting up-dates on my latest creative endeavor. I have had to go back to work. Hubby has been laid-off now for two years. My pension is not covering the bills. I was given the opportunity to go back to work so I have. I will be continuing the blog but the posting is going to be few and far between as I just don't have the time to be as creative.
Catch you when I can!
Judy
Saturday, July 28, 2012
Sister Suzy is off to college
Sister Suzy is off to college in a couple of weeks, so we have been scurrying around getting things ready for her to move into her dorm type apartment. She decided that a pedestal bed that she could store things under was a good idea. So I have made a tailored bed-skirt out of the material we bought for curtains when we were BD (before doors) while building our house.

Then I reupholstered an office chair she had found at a garage sale while out and about with Hubby. The chair had a brick red Herculon fabric that was stained. Original I was just going to make a slipcover for the chair but had a flash of brilliance upon spying a piece of Naugahyde in a tub and went for the reupholstering. It took a while to do because I had to do a mock up of the back in muslin. Naugahyde is not forgiving when you go to poking a bunch of holes in it. The very back of the seat back is smaller than the front of the back. So there was the ease factor to get right between the two pieces, also. The seat was a breeze; just cut a big square and tack it on. I think the chair turned out fairly well, all things considered. (I am going to have to get the blow dryer out and heat up the wrinkle so it relaxes out.)

The next thing I worked on was a bag for her yoga mat, block and belt.

To make one you need a pair of blue jeans that the yoga mat will fit down the leg, two zippers, two 'D' rings, some Velcro, a seam ripper and a good pair of scissors. Trim the hem of one leg then measure up about 29" and cut. Cut the other leg off at the crotch line and open both of legs up flat with the seam ripper. Take off the back pockets and the belt loops.
Measure the circumference of the pant leg then divide by pi and then again by 2 to get the radius of your circular piece for the bottom. Lay that out on the second pant leg and cut it out. For the yoga block pocket I measured up the side across the width and down the other side adding 1" for seam allowances and 1" for ease. I didn't take into account for the couture of the mat when it is in the bag so the block is tight in the pocket. I should have added at least a couple more inches for that. Then I measured up the end of the block and across the length of the block adding 1/2" for seam allowance and 2 1/2" for the hem at the top of the pocket. Then doing my best origami folding, after cutting and putting in the hem at the top, I fold the corners and pinned for all I was worth. I marked the outline of the block on the leg that was to contain the yoga mat and pinned, shuffled fabric around until I had it place where I wanted it and sewed it up. It worked!

Built the strap to hold the block into the pocket and applied Velcro. Next I took the fabric that was left and made the cargo pocket to hold the yoga belt, socks, and gloves. I cut 4" off the top of the piece and inserted the zipper I found in my stash. Did the origami thing again with the marking, pinning and sewing. It worked! Again!

Then I tackled putting the back pockets on the other side of the leg. One pocket is closed with Velcro and the other with a zipper. Easy peasy!


Sewed up the side seam, then put the bottom in along with the bottom part of the strap with the 2 'D" rings. I had to piece the strap together from the seat of the pants cutting it into 3" strips. Next up was the 2" hem at the top of the bag. Then applying the belt loops and bar-tacking the tie strap to the top. Finally I applied the top part of the carrying strap and I was done. (The tie strap came from the flat-felt seam I cut out with my first miss-step at making the bag.)

I showed it to Sister Suzy and she was quite impressed! Yeah!
Have a good day!
Judy

Then I reupholstered an office chair she had found at a garage sale while out and about with Hubby. The chair had a brick red Herculon fabric that was stained. Original I was just going to make a slipcover for the chair but had a flash of brilliance upon spying a piece of Naugahyde in a tub and went for the reupholstering. It took a while to do because I had to do a mock up of the back in muslin. Naugahyde is not forgiving when you go to poking a bunch of holes in it. The very back of the seat back is smaller than the front of the back. So there was the ease factor to get right between the two pieces, also. The seat was a breeze; just cut a big square and tack it on. I think the chair turned out fairly well, all things considered. (I am going to have to get the blow dryer out and heat up the wrinkle so it relaxes out.)

The next thing I worked on was a bag for her yoga mat, block and belt.

To make one you need a pair of blue jeans that the yoga mat will fit down the leg, two zippers, two 'D' rings, some Velcro, a seam ripper and a good pair of scissors. Trim the hem of one leg then measure up about 29" and cut. Cut the other leg off at the crotch line and open both of legs up flat with the seam ripper. Take off the back pockets and the belt loops.
Measure the circumference of the pant leg then divide by pi and then again by 2 to get the radius of your circular piece for the bottom. Lay that out on the second pant leg and cut it out. For the yoga block pocket I measured up the side across the width and down the other side adding 1" for seam allowances and 1" for ease. I didn't take into account for the couture of the mat when it is in the bag so the block is tight in the pocket. I should have added at least a couple more inches for that. Then I measured up the end of the block and across the length of the block adding 1/2" for seam allowance and 2 1/2" for the hem at the top of the pocket. Then doing my best origami folding, after cutting and putting in the hem at the top, I fold the corners and pinned for all I was worth. I marked the outline of the block on the leg that was to contain the yoga mat and pinned, shuffled fabric around until I had it place where I wanted it and sewed it up. It worked!

Built the strap to hold the block into the pocket and applied Velcro. Next I took the fabric that was left and made the cargo pocket to hold the yoga belt, socks, and gloves. I cut 4" off the top of the piece and inserted the zipper I found in my stash. Did the origami thing again with the marking, pinning and sewing. It worked! Again!

Then I tackled putting the back pockets on the other side of the leg. One pocket is closed with Velcro and the other with a zipper. Easy peasy!


Sewed up the side seam, then put the bottom in along with the bottom part of the strap with the 2 'D" rings. I had to piece the strap together from the seat of the pants cutting it into 3" strips. Next up was the 2" hem at the top of the bag. Then applying the belt loops and bar-tacking the tie strap to the top. Finally I applied the top part of the carrying strap and I was done. (The tie strap came from the flat-felt seam I cut out with my first miss-step at making the bag.)

I showed it to Sister Suzy and she was quite impressed! Yeah!
Have a good day!
Judy
Subscribe to:
Posts (Atom)